The Kitchen Sink Smoothie

This smoothie has everything but the kitchen sink! Quick, easy & delicious!

  • Smoothies Super Charge your body
    with essential vitamins & minerals!
  • Make weight loss easier, build muscle &
    improve physical performance.
  • Give your hair, skin & nails a radiant glow.
  • Detox harmful chemicals that
    bombard us on a daily basis &
    ensure excellent digestion.
  • Nutritious disguised in tasty so kids love them!


STEP 1
:

Use the fruit & greens that came in your Sage Mountain Farm Community Supported Agriculture (CSA) box.
Pull out whatever other fruit you have, cut it up and add it to the blender.


STEP 2:

Add juice.

Juice Options: • Organic fresh squeezed orange juice • Coconut milk • Almond milk
• Water • Fruit juice blend (I like Bolthouse) or • Green Tea


STEP 3
:
Grind up a variety of  Seeds & Nuts
Add a few tablespoons or more into the mix.

For a boost of: antioxidants, key proteins, vitamins, minerals, good fats & fiber

  • Flax seeds (a top potent superfood)
  • Raw pumpkin seeds (the only seeds that are alkaline-forming & helps fight depression)
  • Raw sunflower seeds (boosts energy & immunity)
  • Sesame seeds (burns fat, boosts nutrient absorption, balances hormones)
  • Raw almonds (as much calcium as milk!),
  • Raw walnuts (supports brain health),
  • Raw pecans (contain more than 19 vitamins & minerals, boosts brain, heart and bone health)
  • Hazelnuts (rich in energy, heart, brain & skin)
  • Pine Nuts (appetite suppressant, slows the aging process)
  • Brazil Nuts (helps with weight loss, stimulates cell growth & repair, improves digestion & immunity, balances hormones, boosts male fertility & reduce signs of aging)

*Tip: If you don’t have a Nutribullet, use your coffee grinder. To clean, use uncooked white rice and grind.


STEP 4:

Add a Protein Booster

I use a collagen (bone broth) powder. It’s incredible for your joints, hair, skin, & nails.

*You can also add: Matcha green tea powder, Maca powder, Camu camu, Cacao powder, Hemp protein powder, or Grass-fed whey. There are so many choices at your local health food store!


STEP 5:
Top off with frozen berries or ice.

Blend & enjoy!

Visit www.sagemountainfarm.com to learn more about your
local, small, certified organic farm.

Vegetable Soup 

img_3086So, now that the weather is cooling down soup can be added to your menu planning rotation!  That’s great for me because I love soup.  On a cool crisp day, after being outside with your kids, or your animals, or even alone with nature it feels so satisfying to sit down to a steamy bowl of hearty soup.  As with most of my recipes, this is a guide to give you ideas and not a strict formula for soup success.  Although, with soup how could one go wrong?  Well, even though it’s hard to mess up soup, if you don’t add any salt, sometimes people complain, lol!  So, let me qualify…as long as it’s seasoned adequately, it’s hard to mess up soup.

This is a great way to use whatever is in season and whatever you have on hand.  In my bowl I used tomatoes, carrots, potatoes, onions and kale.  Oh, yeah…KALE!  It’s still a very fashionable vegetable and can boost your leafy green intake at any meal.  When chopped up small and cooked in the soup, the leaves just melt in your mouth.  I also added some rice to this vegetable soup to thicken it and make it more substantial for a stand alone meal.  You can start with a vegetable broth or just plain water, toss in your chopped vegetables and your dry rice.  Then bring to a boil and simmer until the potatoes and carrots are tender and the rice is nice and soft.  Then it’s time to add your favorite herbs (dry or fresh) and season with salt and pepper to taste.  Cook for another 5 minutes or so and then remove from the heat.

This soup features onions, carrots and kale from my Sage Mountain Farm CSA box, however you can use just about any veggie from our farm to create a delicious and satisfying soup for your Autumn enjoyment!

Thank You!

Hello everyone!  Thank you to those of you who submitted recipes, photos and ideas for using the delicious food that we grow here at Sage Mountain Farm.  I will be posting some of them here so you can see what others are doing.  Keep comin’ back and you will be inspired by your fellow CSA supporters!

On another note, I wanted to share something with you.  Well, I guess every time I post I am sharing something, but this is more personal.  I finally followed the advise of so many wise kitchen gurus…I prepped all of my veggies this weekend.

What a Time Saver!
What a Time Saver!

What do I mean, specifically?  I washed and chopped lettuce.  I trimmed and sliced onions and garlic.  I washed, trimmed, and ate all of the strawberries right away, of course.  In other words, I made it super easy to use all of my organic veggies and fruits!  Since I prepped, I have used green onions on a few things, onion and garlic in a few recipes, and I have eaten countless small salads.  When this stuff is ready to use in the fridge, it’s easy to use more of it.  When I am hungry I can just reach in and grab a few containers and have a meal started in no time.  I wasn’t taking the time everyday to chop a little lettuce, or slice up one onion, etc.  So when the end of the week came I had items that weren’t used and some which were wilted and destined for the chickens or the compost.  Sad, I know.  Especially considering that this is the freshest and best produce around!

No more…I have done this weekend prep for two weeks now and I am not only being less wasteful in the kitchen, I am also eating more of what comes in my weekly CSA box.

Speaking of being less wasteful, you guys know about saving your vegetable scraps for broth, right?!  I hope so, it’s an awesome way to extend the usefulness of your veggies.  I usually use a plastic freezer bag, placed in the freezer at all times, and fill it with the trimmings from onions, garlic, peppers, celery, broccoli, etc.  Basically any vegetable that you would consider a soup vegetable you can place the trimmings into the bag.  When that bag fills up, dump it into a stock pot and fill with water.  Boil for an hour.  You could also do this in a slow cooker if watching water boil isn’t your thang’.  When you strain out the veggie solids you are left with an unseasoned broth.  Salt and season to your taste, then either use right away or freeze.  I like to freeze my broth in 1-2 cup portions, just right for recipes!  Easy peasy!

Sage Mountain Farm
Homemade broth from the best organic veggies!

Salad Sprinkles

Beets + Carrots = No more boring salads!

Sage Mountain Farm
So pretty! So colorful!

This week I decided to pair up these root veggies for some color on my salads.  Shredded carrots are a pretty standard topping for a green salad, but add some shredded beets and you have added a pop of vibrant color along with four times the protein of carrots and twice as much potassium!  Carrots are no slouch, however because they’ll give you twice as much Vitamin A as you need in a day and are lower in carbs than beets.  Paired up, these two colorful veggies make some nutritious eye candy for your lettuce!

So, I know that this isn’t really a recipe, buuuuuuuuut sometimes just an idea from someone else will spark inspiration and get you thinking outside of your routine.

However you shred your carrots, be it box shredder or food processor, shred your beets the same way.  WARNING: Beets are so messy!  I like to put a paper towel or a cutting board under the surface that I am working on so that clean-up is a bit easier.  Use equal parts of carrots and beets for the perfect look!

I am thinking of trying the combo out in other dishes as well.  Wherever you use shredded carrots you could sub these “salad sprinkles” instead for a new twist.

I will share with you the salad that I made using these “salad sprinkles”.  Try it out and let me know what you think!

Pineapple Salad with Salad Sprinkles

All I can say is YUM!

Ingredients:

1 head Romaine lettuce, chopped to your liking

1 cup of pineapple chunks or tidbits

1 cup Salad Sprinkles (equal parts shredded carrots and beets)

Sage Mountain

2 T of citrus vinegar* (I use Trader Joe’s Orange Muscat Champagne Vinegar)

*If you don’t have any citrus vinegar you could use pineapple juice or orange juice

Gently toss the ingredients together and enjoy!

Once you have tried the salad, let me know if these “salad sprinkles” end up in any other recipes you make this week.  I’m thinking stir fry, chili, or even a quick bread…. The possibilities are endless.

Two Spinach Smoothies

It’s smoothie time!  I do like me some kale and lettuce, but when I saw the spinach in my CSA box, I immediately thought of smoothies!  The weather is warming up and so I like to change up my usual breakfasts from the comforting oatmeal or hash brown scramble to a cool and frosty treat.

I will admit right off the bat that I have a Vitamix.  For reals though, I got it second-hand so don’t be a hater.  Yes, they are expensive and yes, they are worth every penny (if you actually paid for one, which luckily I didn’t have to).  Don’t worry though, I will not give you any recipe where you will have to blend an entire Chevrolet into a decadent dessert or something.  It’s all fruits and veggies, peeps.  Anything I do in my blender, you can do in yours.

With that out of the way, let’s talk about my favorite way to consume spinach.  I think that a few “go-to” strategies are important when you are eating healthfully, especially if, like me, you grab whatever is easiest more often than what is most nutrient-dense.  It is a bonus when you can set yourself up for success by knowing ahead of time what is easy and healthy!

Sage Mountain Farm
Ready for some smoothie action!

A great tip to be ready for smoothies whenever the mood strikes is to keep frozen bananas in your freezer at all times.  I intentionally buy extra bananas and let them over-ripen on my counter, then I peel ‘em, roll ‘em in foil and freeze ‘em.

Enter my two smoothies…

The first is a fruit smoothie.  The best fruit to hide greens in (that is why we put greens in smoothies, right?!  I mean, if you wanted salad for breakfast, eat it on a plate and have a mimosa to drink!) is mangoes.

Sage Mountain Farm
Frozen Mangoes!

I buy a big bag of organic frozen mangoes.  They are cubed and ready for smoothies.  I think that they can even stand up to kale, if you are so bold!

Sage Mountain Farm
Oh…Stick a straw in it!

Green Smoothie – Mango Style!

Spinach (as much as you can cram into your blender)

1 frozen banana, cut into slices

Frozen mango chunks (between ½ and 1 whole cup)

2 cups pineapple juice (or water, or oj, or plant milk, etc.)

Blend it then stick a straw in it and pretend you are on a beach somewhere, soaking up some rays!

Smoothie number two is a treat!  Well, anything healthy and delicious is a treat, but this is a “sometimes-smoothie” for me.  I feel indulgent when I drink this.  I save this for when I need a little boost, a little “me” treat.   It is a chocolate peanut butter smoothie, that also just so happens to contain vegetables.

Sage Mountain Farm
When chocolate and peanut butter love each other very much…

Green Smoothie – Chocolate PB Style!

Spinach (as much as you feel like)

2 frozen bananas, cut into slices

1 heaping tablespoon of natural peanut butter

1 heaping tablespoon of cocoa powder

A dash of cinnamon

A dash of vanilla

1 to 2 cups of non-dairy plant milk (or water, or even cow’s milk if that’s part of your diet)

A few ice cubes (cuz’ this tastes best as frosty as possible)

Blend, then drink while binge watching your favorite show!

Both of these breakfasts are full of plant powered nutrition and will help you get your day started right.  They can also be consumed for a snack or lunch, or whenever.  Feel free to experiment with the greens that you include.  Spinach is the easiest green to disguise, but lettuce, kale and chard are all worthy of a try.  “Taste it as you make it”, use what you have on hand and enjoy the bountiful health provided by nature in a cup!

Green Garlic Storage Tip

Hello!  You know, the first week we got the green garlic in our boxes I just chucked it in the crisper and went about the business of unloading the rest of the box.  Then later in the week, when I wanted to use it, I found it had wilted.  It still tasted great, but it looked sad and less of the green leaves were usable because they had become withered.

Not wanting a repeat of that I decided to store it differently this time.  This time I thought…hey it still has roots, it’s a plant, right?!  So I put it in a glass, filled with an inch of water and set it on the counter.  Guess what?  The rest of the week the green garlic was firm and upright!

Winner! We have a winner!

There is a trade-off, the tips yellow a bit but I think that it is a better storage option because throughout the week more of the plant is useable than the wilted version from the crisper.  Just trim off the tips where they have yellowed (from overwatering, I think) and enjoy more of that mouth-watering garlic flavor!

Do you store your green garlic differently?  Have you had success? Failure?  What works in your kitchen?  Let’s have a conversation!

Fresh Ginger Storage Tip

A long time ago I bought some fresh ginger at the store to make a ginger tea.  Boiling water poured over a few small slices of fresh ginger, let steep, voila!  Ginger Tea!

Then I had a knobby ginger root to store, so I put it in the fridge.  Life has a way of moving along and then you forget about little things like the knobby ginger root that is waiting ever so patiently for you to use it again.  As it turns out, the fridge and/or the counter are not great places to store fresh ginger unless you are going to be using it all up fairly quickly.

Sage Mountain Farm
Keep fresh ginger in the freezer.

The best place, in my experience, to keep fresh ginger is in the freezer.

I place the ginger root in a plastic freezer bag and store it in the door of my freezer so I always have fresh ginger available for tea or for my Citrus Ginger Sauce!

Sage Mountain Farm
Use the back of a spoon to “peel” ginger.

Oh, I almost forgot…another tip (it’s a twofer!), when peeling the papery covering off of fresh ginger, use the back of a spoon and scrape.

Citrus Ginger Sauce

Here it comes, are you ready?  This recipe today is an original recipe that I have come to rely on at least twice a week.  This is the first recipe in a series that will make it easy for you to eat your greens.  Greens alone are a humble powerhouse of nutrition, but not the poster veg for glamour like say, asparagus or artichokes.  This sauce is the little black dress that will boost your greens to the next level!

Citrus Ginger Sauce

Ingredients:

1 whole (large) orange, peeled

3T soy sauce

2 cloves of garlic

½ inch of fresh ginger

1 T honey

Instructions:

Place all of the ingredients in your blender.  Blend until the orange, ginger and garlic are fully broken down and incorporated.  Easy peasy!  Now since oranges are not all the same size and not everyone’s tastes are the same, I would encourage you to taste your sauce.  You can adjust it as necessary by adding more soy sauce or more honey.  This template works for me (as written) almost every time.

Now, how can this sauce be used for greens?  Here’s how I do it.  First I chop my organic greens into bite size pieces.

Sage Mountain Farm
Slice greens horizontally

This step is important, especially if you are feeding these greens to a kid or someone who is reluctant to eat greens.  I find that it usually isn’t the flavor of greens that puts people off, it’s the texture of cooked greens that does.  Chopping them into bite size, or smaller, pieces gives the greens a more acceptable texture for most people.

Sage Mountain Farm
Chop your strips into bite sized pieces

Next, I rinse them under cold water.  No need to dry them or drain them completely, just shake ‘em off and toss into your pan.  Into the pan you should now add your sauce and an equal amount of water.  How much sauce and water depends on how much greens you are preparing.  On a typical weeknight I will use one bag of greens to half of the prepared sauce and about a cup of water (this is really just a guide, but it’s what I do).  Give your greens a little stir so that the sauce and water are nicely spread throughout the chopped greens.  Put the lid on your pan and wait until things are steaming and boiling, then turn the heat down low and let the magic happen!  For thicker greens, such as kale, collards, and broccoli greens, expect to cook for about 10 minutes.  For more delicate greens, such as spinach, mesclun or spicy salad mix, you should test them around four to five minutes.  Again, this is all up to your taste.  You can use whatever greens you have on hand with this sauce.  I have even used it for broccoli florets.  The sky’s the limit!  It’s a tasty way to enjoy just about any veggie.  To serve you can use these as a side dish as is, or over some rice (we like ‘em with pineapple chunks) as a main dish!

If I have one piece of advice it’s “taste it as you make it”.  The first time you taste your food should not be as everyone else is sitting down to the table and starting dinner.  Don’t fret, food is fun!  You can’t go wrong if you start with a good template and taste as you go.

Prep for Organic Broccoli

Broccoli is one of my all-time favorite veggies.  I have always liked it, even as a kid.  My Granny and I were the ones at get-togethers standing by the veggie tray eating the broccoli.  It’s something we’ve shared, and I like that.

Sage Mountain Farm
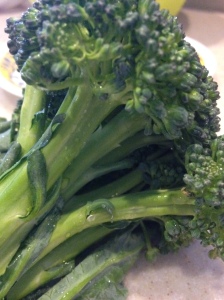
Aphids Love Organic Broccoli!

Here’s the tricky bit, virtually ALL organic broccoli has aphids.  Why, well because aphids (the little greenish-grey guys hiding in your florets) love broccoli and are nearly impossible to get rid of organically.  Organic eating means dealing with a few bugs rather than ingesting toxic poison. It’s a trade-off, but one that has amazing benefits for your health, and the health of the Earth.

No need to feed your chickens any more of that fabulous broccoli.  No need to [gasp] send nasty emails to the hardworking folks at the farm, not that you would do that, ahem [cough, cough].

Here is the method that I used today to get those pesky aphids out of my organic broccoli.  First I separated the bunches of broccoli from each other.  Then I filled up my sink with cold water about half way.  Next I added salt to the water.  Think ocean water as you taste it.  Seriously, add about a 1/4 to 1/2 cup of salt to your sink.  Then comes the part that you may or may not enjoy.  I found it astonishing, but rewarding because I now knew that my broccoli would be clean and shiny when I was done.  Using a quick plunging motion, crown down in the water, get rid of the aphids.  Shake and plunge and shake and plunge.  You will see the little buggers just floatin’ away.

Sage Mountain Farm
Clean and Shiny!

Repeat with all of your broccoli and then set them aside, while you drain and rinse out your sink.  Then, using a sprayer if you’ve got one, rinse thoroughly with cold running water.  Voila!  Clean and shiny!  Way to go!

Oh! One more thing…Do this as needed.  By that I mean, if you want broccoli for dinner, do this as part of your meal prep.  Do not do this ahead of time, you will end up with rubbery broccoli.  After this careful, loving preparation it would be devastating to rubberize your prized broccoli, no?

Now that my organic broccoli is prepped and ready to enjoy, I can call my Granny!