3-2-1 Pinto Beans

Hey everyone!  I want to share with you today one of the recipies that I make at least once a week, if not twice.  This is how I make my pinto beans.  A lot of people ask for this recipe, so here it is!

Ingredients:

3 cups dried pinto beans, soaked overnight

3 dried chiles de arbol (or chile japones), with the stems picked off

3 Tablespoons of dried chopped onion, or a 10 oz bag of frozen diced onion or 1 medium onion chopped (This is a great place to use some fresh organic onions from your CSA box)

2 Tablespoons of dried ground cumin

img_2761

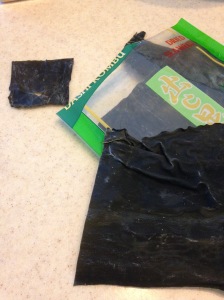
2 in square of Kombu seaweed (this one is totally optional.  I recently started adding this to help with the digestibility of the beans, it breaks down mostly while cooking and can be scooped out at the end, or blended into the beans, it really doesn’t change the flavor of the finished beans.)

1 Tablespoon of granulated garlic, alternately you can ad fresh minced garlic from your CSA box!

1 Tablespoon of salt


Method:

Soak beans overnight, then rinse them well.  Place rinsed and soaked beans into your pressure cookimg_2758er and add the rest of the ingredients.  I like to break my dried chiles into smaller pieces because I img_2763blend them into my beans.  If you want the flavor of the chiles but not too much spice, then leave the chiles whole and discard after cooking, before blending.
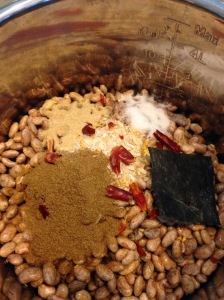
img_2764Fill
your pot to 1 inch above the beans.  This will give you an excess of liquid, but more is better, and as you will see it is possible to ladle out the extra water before blending the beans.

Use either the bean or the manual setting on your img_2765pressure cooker and adjust the time up to 45 minutes.  Make sure it is on high pressure and that the steam valve is closed for pressure cooking.

While you wait, this is a great time to chop some onion and cilantro, hit that with a little squeeze of lime juice and salt…heaven on a taco!

When the time has come to open your pressure cooker (I would let the pressure come down on it’s own rather than a rapid release because beans create a lot of foam while cooking and it is a total disaster, I know this from first hand experience…more than once…) you will fill your home with a delicious smell that will make you hungry!

Now is decision time.  Whole beans or “re-fried” aka blended?  Spicy or mild?  If your goal is spicy and whole, do nothing.  Use a slotted spoon and serve these bad boys on a tortilla, or over chips.

If your goal is a “re-fried” bean analog (only healthy because they are made without oil), then you need to either remove the chiles or not based on your heat preference.  Then you will need to ladle out as much water as you can without becoming OCD about it! img_2766 Seriously, if the beans are a bit runny the first night, while they are refrigerated overnight they will soak up some of that extra liquid and become firmer the next day.  This is really personal preference.

img_2767I use an immersion blender for this step.  You could use a fork, a potato masher, or a blender if you like…or see the instructions for whole beans above!  Blend or mash until the beans look like the right consistency to you.  Some people like ’em totally mashed and others like to see some whole and partial beans in the mix.  It’s totally up to you!


Voila!  Beans, done.  If you give this recipe a try, let me know in the comments below.  Tacos and nachos and even enchiladas are a great way to feature some of the great produce and meats that we have here at Sage Mountain Farm!

P.S. If pressure cooking isn’t your bag, these beans can also be done in a crock pot on high for most of the day, or even on the stove (if you don’t mind the heat in the middle of summer, ugh!).


Greens Galore!

Hello Again, I liked the format of last week’s post so much that I decided to do the same thing this week as well.  The title this week is greens galore, and that really is what Spring has brought us in our CSA boxes.  Tons of nutritious dark leafy greens!  I am pleased to say that my family and I were able to make use of ALL the greenie goodness this week without leftovers or waste.  I get so bummed out when I can’t get to all my fresh organic veggies fast enough.  You know, those busy weeks when it seems like sitting down to a meal at home is a challenge?  Well this week was a great example of determination and pre-planning.  When you find yourself with a mountain of greens, you can use the tags to search for all of my posts that feature greens.  Among them are some of the recipes that I made for my family this week and one new one!

The top left photo is a new recipe for me.  It is Spinach Potato Tacos and comes from Forks Over Knives.  I loved this recipe and it got good reviews from my kids and husband.  We eat tacos a lot and this was a new twist on a familiar favorite.

Top right is a photo of a typical Tuesday night here at my house…Taco Salad!  One of my go-to meals, taco salad is easy and nutritious.  Plus, the bonus of meals like this is that everyone gets to customize their own plate!

Bottom left is a photo of Lentil Sloppy Joes.  I  made this recipe last year and so this year when searching for a way to incorporate cooked greens into our main dish, I revived it, but with a few new suggestions.  Last year when we ate these we pretty much just ate the lentil mixture on toast and that was that.  This year I offered condiments, for more of a burger type feel to the meal.  It worked like a charm.  These toppings enticed some of my pickier eaters to enjoy, and even request a second helping, of lentils and greens.  What mom wouldn’t be pleased?!

The next photo (the one that looks mysteriously upside down, weird…), is just some leftovers.  Lentil sloppy Joe mix over a baked potato and a salad, utilitarian I know, but that’s an honest look at what happens for dinner sometimes.  Can’t always be gourmet you know, lol!

For the final photo there is a picture of Green Soup topped with almond Parmesan and green onions.  This recipe is the best way to subdue a ginormous pile of greens, hands down!  I can’t think of any other recipe that will allow you to use such a volume of leafy greens.  I have eaten this soup every morning this week for breakfast and it keeps me full for a long time.

So that’s all folks!  My week of delicious, organic food from my Sage Mountain Farm CSA box!  Hope you enjoyed this peek into my week.  What did you do with your greens this week?  Let me know in the comments…

Pineapple “Unfried” Rice

Sage Mountain Farm
Garnish with fresh cilantro for a great lookin’ plate!

Today we will be using a recipe from the YouTube show, The Chef and The Dietician.  They call it Pineapple Unfried Rice.  Ya’ know, fried rice…only not fried.  No oil and veggie-packed folks, about as healthy as you can get!  Bring it on! 

This is a super tasty recipe.  Hubby and kids approved and I, of course, loved it.

I used the veggies that I had on hand from this week’s CSA box instead of the ones that they suggest.

Sage Mountain Farm
Chopped and Ready!

It is a versatile recipe and the combo of pineapple with cilantro is out of this world!  Like, crazy good!  It is easy to throw together on a weeknight and tasty enough to serve to guests.  I think that it is safe to say that this is a hit!  You could easily scale this recipe up or down to fit your appetite and family size.  Though it packs great as a lunch to-go, so I don’t think you should scale it down…just pack it up in individual servings and eat it at school, work or anywhere your adventures take you.

Some things to note:

#1  A confession…You may notice from one of the pictures that I made this recipe using white rice, not the uber-healthy brown version.  Sue me!  I had some leftover and I just went with it.  “Waste not, want not”, right?!

#2  I used shredded carrots, but this is a great place to try out the salad sprinkles that we made earlier this week.  You really could use any combination of veggies that you happen to have on hand, even leafy greens could make up some of the vegetables in this.

#3  They suggest coconut aminos but Bragg’s or regular soy sauce will give you the same flavor profile, use what you have and “taste it as you make it”!

Sage Mountain Farm
Saute in juice…zero added fat.

Pineapple Unfried Rice

Ingredients:

2 cups pineapple chunks

1 cup pineapple juice

3-4 cups chopped or sliced veggies (I used carrots, broccoli, broccoli greens, and green garlic)

Grate some ginger in as well (my addition to the original recipe)

4 cups leftover (meaning already cooked) brown rice

Sage Mountain Farm
Stir in leftover rice.

½ cup soy sauce (Bragg’s or tamari or coconut aminos are all fine here)

1 bunch of cilantro, chopped

Instructions:

Heat pan on medium high with ½ cup of the pineapple juice.  Cook your vegetables, garlic and ginger.  Put rice in with the veggies and continue to stir as it all cooks.  Add the other ½ cup pineapple juice if needed and the soy sauce.  Then add the pineapple and cilantro.  Stir to combine.  Serve and enjoy!

I hope that your family likes this as much as mine does.  It really is a great template for any combination of veg that you are enjoying from your CSA box or farmstand purchase.

Spicy Spaghetti Squash with Black Beans

Before winter is over and winter squash is “sooooo last season” (insert valley girl accent here, lol!) I have a couple of recipes to share with you that will give you some new things to do with the winter squash that is still around.  This one is specifically for that silly, stringy, spaghetti squash.  When I first heard of spaghetti squash, no doubt similar to all of you, I thought that it would be a great replacement for pasta.  Roast spaghetti squash, top with red sauce, eat.  Well, it was okay, but the kids wanted their pasta back.  It wasn’t enough of a novelty to convince them that it was “just like spaghetti”.  I needed something that used spaghetti squash as its own ingredient, not a substitute for pasta.

If the pasta substitute works in your home, great!  If not, or if you are looking for something “Southwesterny delicious” (sings in head like Lucky Charms theme ‘magically delicious’), then follow along for something super great!  You can use your organic spaghetti squash and your organic cilantro from Sage Mountain Farm in this incredible meal.  This recipe is originally posted here on Whole Foods website.

Sage Mountain Farm
Use a fork to rake up individual strands of squash.

Ingredients:

1 medium spaghetti squash, halved lengthwise and seeded

2 teaspoons extra-virgin olive oil

1/2 cup chopped red onion

1 jalapeño pepper, seeded and minced

1/2 cup red bell pepper, chopped

1 cup cooked black beans

1/2 cup sweet corn, frozen or fresh

1 teaspoon chili powder

1/3 cup fresh cilantro, finely chopped

1 tablespoon lime juice

1 teaspoon fine sea salt

Method:

Preheat the oven to 375°F. Arrange squash in a large baking dish, cut-sides down. Pour 1/2 cup water into the dish and bake until just tender, 30 to 35 minutes. Rake with a fork to remove flesh in strands, leaving the shell intact for stuffing.

For the filling, heat oil in a large skillet over medium heat. Add onion, jalapeño and bell pepper and cook for 2 minutes or until soft. Add beans, corn and chili powder; cook, stirring frequently, 1 minute longer. Add cooked squash, cilantro, lime juice and salt, cook 1 minute until heated through.

Fill squash halves with filling, mounding mixture in the center.

Sage Mountain Farm
Mixin’ up the Fillin’

I made a few changes when I cooked it myself.  I omit the olive oil and just “water sauté” instead, just a personal preference (I like to reduce the amount of added fats and oils in the foods that I cook).  I also roasted the spaghetti squash whole.  It works great either way, just personal preference again.  One more thing, I didn’t leave the shells intact and refill them with the mixture.

Sage Mountain Farm
Servin’ it up, Nacho Style!

Since I serve this for many people as a nacho topping, it seemed more appropriate to leave the mixture loose and just toss the shells.  My family enjoys this quite a bit served with tortilla chips, but I also think it would be excellent served in soft, warm corn tortillas!  By the way, the leftovers reheat great, so it’s a wonderful healthy meal to take-along!