Summer Ratatouille

Sage Mountain Farm
Summer’s Bounty, Beautifully Layered!

When I saw the gorgeous purple and white Japanese eggplant this week in my CSA box, I was filled with longing and dread.  Let me explain… My favorite color is purple, so naturally I love the eggplant with it’s deeply purple skin.  A vegetable that’s purple, what could be better? (perhaps a purple cookie…I digress) So of course, this explains the longing.  I want to love the flavor of such a beauty as well.  Which leads to the dread.  I have NEVER been able to prepare eggplant myself that tasted any good.  It had become such a problem that I had been banned from ever buying an eggplant again.  Sometimes you just gotta cut and run.  Let things lie…you know, quit while you’re ahead and such.

Since this eggplant came to me via my weekly farm box, I didn’t feel like I was violating the eggplant ban because I didn’t choose it, it chose me, so to speak.  I knew that I had to try again to catch my unicorn…decent homemade eggplant.  This time I nailed it!  But what was different this time you might ask?  Two things were different, and both contributed to my new-found success.  First I had never tried Japanese eggplant before, always the big fatties.  This was a good change because one of the problems that I usually encounter with home cooked eggplant is the chewiness and I think eggplant texture is a good example of a little being good and too much being not so good.  Second, I finally took the time to prepare the eggplant ahead of time.  It is usually listed as optional in eggplant recipes, but I have found it to be completely mandatory!  You must salt, drain, squeeze, rinse and pat dry.  You must.  I promise that it makes a huge difference.

All of the summery goodness that I needed for ratatouille was at hand, thanks to Sage Mountain Farm.  I had eggplant, leeks, tomatoes, garlic, fresh basil, and zucchini.  This dinner went over well with the fam and I have to say that the smell coming from my oven when this was baking was A. MAZE. ING!  Try it and you’ll see for yourself!

Summer Ratatouille

4-5 Japanese eggplant, sliced and prepared ahead of time (NOT OPTIONAL)

3 zucchini, sliced

5-6 small tomatoes, sliced

8-10 cloves of garlic, minced

2 leeks, sliced

1/2 c vegetable broth, divided (or olive oil, or a combination of both)

fresh basil, chopped

salt and pepper to taste

Method:

First thing to do is to prepare your eggplant.

Sage Mountain Farm
Eggplant slices

Get out a colander and place a layer of eggplant slices in the bottom.  Salt this layer liberally.  Another layer of sliced eggplant, more salt.  Lots of salt.  The purpose of this is to draw out the excess moisture, which can give eggplant a slimy mouth-feel, and any bitterness that may be present.  You will end up rinsing this salt off so don’t worry about how much to use.  Continue to layer eggplant slices and salt until you have sliced and salted it all.  Let this drain in your sink, and walk past occasionally to press the whole thing lightly.  I put a bowl on top of the eggplant that fit inside my colander to do my pressing for me.

While this is going on slice up everything else.  Get out a glass casserole dish and put a little olive oil or broth in the bottom and then preheat the oven to 350 degrees.

Once everything is prepared and your eggplant has been draining for between 30 minutes and two hours you are ready!

Start your ratatouille with a layer of leeks.  Next, for the eggplant layer, you need to grab a handful of eggplant slices and squeeze hard under running water.  Pat these slices dryish and build your eggplant layer.  This will take several handfuls in my experience.  After the eggplant layer, put on zucchini slices followed by tomato slices.  Then salt, pepper, garlic and basil all over the tomatoes.  Continue making these layers until all of your ingredients are used up.  When that happens take the rest of your broth (or olive oil) and drizzle it all over the top.  Bake for about one hour and enjoy the smells coming from your oven!
Sage Mountain Farm
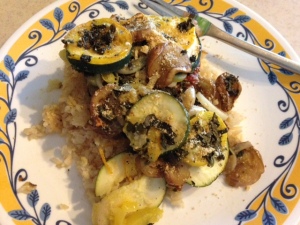
Another veggie packed meal!

We served this over brown rice with almond Parmesan on the top!  Try it out and let me know how you liked it!

Fingerling Oven Fries

Sage Mountain Farm
Potato Perfection!

Update:  Potatoes are in again at the farm and so I am re-posting this great recipe for fingerling potatoes.  If you have been following the blog for a while you may recognize it, if not please enjoy one of the easiest and tastiest snacks/side dish out there.  This recipe also works for new potatoes as well, or full sized potatoes for that matter, you just have to cut them more.

Fingerling potatoes were like super-hot in the food world a while back, and I am really just now discovering why.  The flavor is great but that’s not the biggest reason why I love them.

LAZINESS! That’s why.  Total laziness!

For a busy mom, oven fries are a healthy alternative to the frozen pre-fried kind, but they are a lot of scrubbing and slicing and turning, etc…in walks the fearless fingerling.  Mini sized means many things…less scrubbing, less slicing, less work post oven-insertion!  With the size of these tasty morsels being what they are, only about half of them even needed slicing.  The ones that were chubby, I cut in half lengthwise.  Most of them I just left whole.  This is another one of my non-recipe recipes.  You can vary the seasonings to fit your tastes.  Here we go…

Fingerling Oven Fries

Ingredients:

One bag of Sage Mountain Farm’s fingerling potatoes

3-4 Tablespoons of Homemade vegetable broth

A generous amount of Lemon Herb Salt

Method:

Sage Mountain Farm
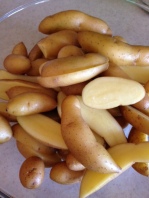
Naked Taters in a Bowl!

Preheat oven to 425.  Wash your potatoes and slice the chubby ones in half, lengthwise.  Place your potatoes into a big bowl.  Over top of the potatoes spoon your broth (this could be olive oil if you like, but I like the cleaner, less calorific flavor of broth instead).  Now grab some salt.  Really, grab a good sized, chef-like pinch just like on Food Network.  Sprinkle this into your bowl and use your hands to make sure that each fry gets brothy and salty.  Spread these out on a baking tray.

Sage Mountain Farm
Waiting to be baked…

I used a silicon baking mat for maximum non-stick, another option would be parchment paper or a lightly sprayed sheet pan.  Pop these delicious taters into the oven for 30-40 minutes.  Make sure that about halfway through the cooking time you open the oven and give the baking tray a few good shakes.  The great thing about the fingerlings versus the sliced full sized oven fries is that they are (mostly) round and so you really don’t need to use a spatula to turn them all individually.  You can just shakey-shake and move on to smelling them cook!

We have seriously eaten these for like three or four days in a row at lunch time!  Kids like them, I like them…all in a day’s work, hope you enjoy!

Thank You!

Hello everyone!  Thank you to those of you who submitted recipes, photos and ideas for using the delicious food that we grow here at Sage Mountain Farm.  I will be posting some of them here so you can see what others are doing.  Keep comin’ back and you will be inspired by your fellow CSA supporters!

On another note, I wanted to share something with you.  Well, I guess every time I post I am sharing something, but this is more personal.  I finally followed the advise of so many wise kitchen gurus…I prepped all of my veggies this weekend.

What a Time Saver!
What a Time Saver!

What do I mean, specifically?  I washed and chopped lettuce.  I trimmed and sliced onions and garlic.  I washed, trimmed, and ate all of the strawberries right away, of course.  In other words, I made it super easy to use all of my organic veggies and fruits!  Since I prepped, I have used green onions on a few things, onion and garlic in a few recipes, and I have eaten countless small salads.  When this stuff is ready to use in the fridge, it’s easy to use more of it.  When I am hungry I can just reach in and grab a few containers and have a meal started in no time.  I wasn’t taking the time everyday to chop a little lettuce, or slice up one onion, etc.  So when the end of the week came I had items that weren’t used and some which were wilted and destined for the chickens or the compost.  Sad, I know.  Especially considering that this is the freshest and best produce around!

No more…I have done this weekend prep for two weeks now and I am not only being less wasteful in the kitchen, I am also eating more of what comes in my weekly CSA box.

Speaking of being less wasteful, you guys know about saving your vegetable scraps for broth, right?!  I hope so, it’s an awesome way to extend the usefulness of your veggies.  I usually use a plastic freezer bag, placed in the freezer at all times, and fill it with the trimmings from onions, garlic, peppers, celery, broccoli, etc.  Basically any vegetable that you would consider a soup vegetable you can place the trimmings into the bag.  When that bag fills up, dump it into a stock pot and fill with water.  Boil for an hour.  You could also do this in a slow cooker if watching water boil isn’t your thang’.  When you strain out the veggie solids you are left with an unseasoned broth.  Salt and season to your taste, then either use right away or freeze.  I like to freeze my broth in 1-2 cup portions, just right for recipes!  Easy peasy!

Sage Mountain Farm
Homemade broth from the best organic veggies!